- HomeLab How To
- Posts
- Preparing Your Hardware and Creating Installation Media for Your Homelab
Preparing Your Hardware and Creating Installation Media for Your Homelab
Getting things ready to install an Operating System
Adam Reid
June 28, 2025
If you’ve been following this series so far, you should have your hardware picked out and purchased. The next step is to install an operating system (OS) on the hardware. If you have never installed an operating system before this may sound daunting. Not to worry though, this step-by-step guide will walk you through configuring your system's BIOS settings, creating a bootable USB drive, booting the OS installer, and and installing Ubuntu Server 24.04 LTS as our OS of choice.
Accessing and Configuring BIOS Settings
Before you can boot from your installation media, you need to access your computer's BIOS/UEFI settings to configure the boot order and enable virtualization features.
Finding the Right BIOS Key for Your System
Different manufacturers use different keys to access the BIOS/UEFI settings. Here's a quick reference for common brands:
Manufacturer | BIOS Access Key(s) |
|---|---|
Dell | F2 or F12 |
HP | F10 or Esc |
Lenovo | F1, F2, or Fn+F2 (varies by model) |
ASUS | F2 (PCs) or Del (Motherboards) |
Gigabyte | F2 or Del |
MSI | Del |
Essential BIOS Settings to Configure
Once you've accessed your BIOS/UEFI settings, configure these important options:
Boot Order: Set your USB drive as the first boot device to install Ubuntu Server
Virtualization Technology: Enable Intel VT-x/AMD-V to support virtual machines in the future
UEFI/Legacy Boot Mode: For newer hardware, UEFI mode is recommended, but Legacy mode may be needed for older systems
Secure Boot: Consider disabling this temporarily if you encounter boot issues with Ubuntu
Fast Boot: Disable to ensure all hardware is properly initialized during startup.
Your BIOS may look different that what’s shown here, and the menu’s may be different, but you should be able to find the same options if you explore your BIOS’ menus.
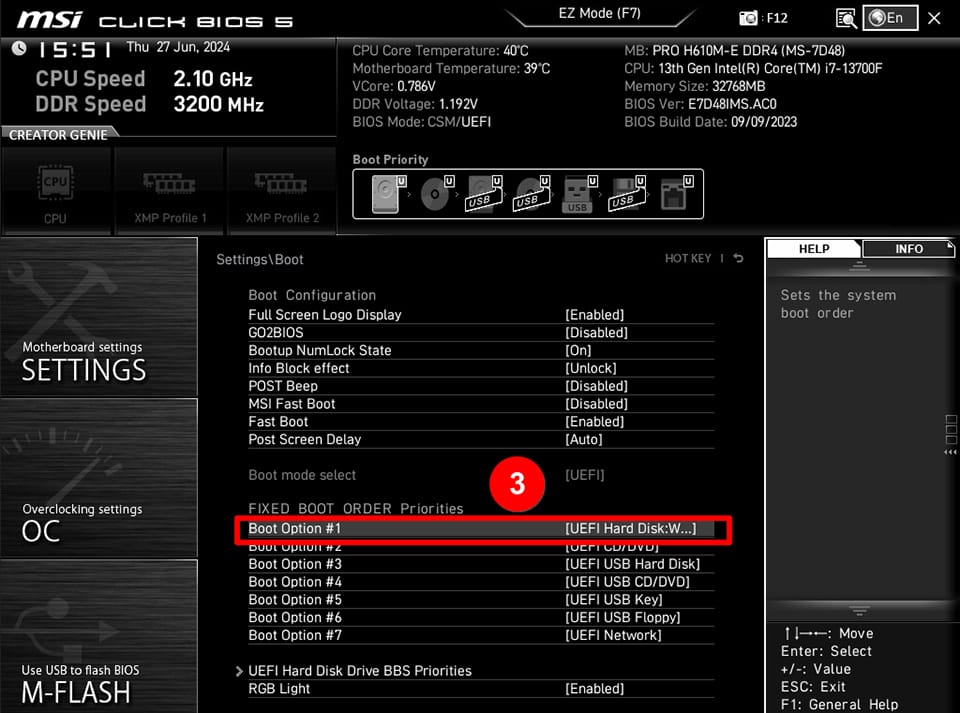
MSI Click BIOS 5 interface showing the boot order settings in the "Settings\Boot" menu
The boot order configuration is particularly important as it determines which device your system will attempt to boot from first. Most modern BIOS interfaces will display this setting in a menu similar to the one shown above.

Aptio Setup Utility displaying options to configure the launch policy for UEFI and Legacy Storage OpROMs.
For systems with UEFI, you'll also need to configure the storage OpROM policy as shown above, which determines how your storage devices initialize during boot. Setting this to "UEFI first" is generally recommended for modern systems.
Creating a Bootable USB Drive
To install Ubuntu Server, you'll need to create a bootable USB drive with at least 4GB of capacity. For this process you will need a tool called balenaEtcher. We chose this tool because it supports Windows, MacOS and Linux and provides a clean easy to use interface.
Download Ubuntu Server
Our focus is on installing Ubuntu 24.04 LTS server. To do this you will need to download the disk image of the installer from Ubuntu. Go ahead and download that now.
Creating a Bootable USB with balenaEtcher
Warning: These next steps will erase all content on the USB drive. Make sure there is nothing important that you don’t have backups of on your USB drive.
Download and install balenaEtcher from the official website
Insert your USB drive and open balenaEtcher
Click "Flash from file" and select the Ubuntu Server ISO you downloaded in the last section.
Click "Select target" and choose your USB drive.
Click "Flash!" to begin the process
Planning Your Network Configuration
On most home networks new devices will be given an IP address automatically by your router, but it’s not guaranteed they will always have the same address. For a homelab server, getting access to your services will be much easier if you always know the correct IP address of the server. To prepare ourselves for the OS installation we will gather some key information so we can configure our server with a static IP address.

Home network diagram showing static IP configuration for a homelab server
Key Network Information to Record
Most of the information you need can be found by looking at the network configuration of a device already connected to your network. Running the commands ipconfig /all in Windows, ip addr in Linux, or ifconfig in MacOS from one of these devices will print a bunch of network info to the screen.
IP Address: The unique identifier for your server on the network (e.g., 192.168.1.100). You may need to log into your home router and set aside an IP address for your server. Otherwise the router could assign your chosen address to another machine. Check your routers documentation for details.
Subnet Mask: Defines the network range, or first and last address available on the network.
Gateway: Your router's IP address, used for internet access (typically 192.168.1.1)
DNS Servers: Translate domain names to IP addresses. If in doubt use your router’s address for this. Alternatively you can use well known public DNS servers like Cloudflare (1.1.1.1, 1.0.0.1) or Google (8.8.8.8, 8.8.4.4)
Keep this information handy so it’s ready for our next step, Installing Ubuntu 24.04 LTS Server!
Previous: Evaluating Your Hardware | Next: Installing Ubuntu 24.04 LTS
Series Overview: Why Build a HomeLab?