- HomeLab How To
- Posts
- Evaluating Your Hardware: What You Need and What You Already Have
Evaluating Your Hardware: What You Need and What You Already Have
You need less than you think to get started with a homelab.
Adam Reid
June 22, 2025
So, you’re ready to start your home lab adventure—awesome! The first real step is figuring out if your old computer (or the one you’re thinking of buying) is up to the task. Don’t worry, most hardware from the last decade will work just fine, especially if you’re just getting started. Let’s break down what to look for and how to check what you’ve got.
Understanding Your Hardware Requirements
Before you begin the installation process, it's essential to verify that your repurposed hardware meets the minimum requirements for our chosen operating system, Ubuntu Server 24.04 LTS. The official requirements include:
Processor: 1 GHz dual-core processor (Intel 6th generation or AMD equivalent recommended for better performance)
RAM: 1 GB minimum (3 GB or more recommended for comfortable operation)
Storage: 25 GB minimum free disk space (more if you plan to host media files)
Network Interface: Working Ethernet connection (for installation and server operation). Wifi also works, but having a reliable wired connection is better for consistent network performance.
For a homelab media server, you'll want to exceed these minimums, particularly for RAM (8GB+) and storage (500GB+) to ensure smooth operation for multiple services.
What Kind of Form Factor Works Best?
When selecting hardware for your homelab server, consider these factors based on your specific needs and constraints. Each option has distinct advantages and trade-offs as shown in the comparison above.
Mini PCs (like Intel NUC) offer excellent energy efficiency and quiet operation but have limited expandability. These can be great choices if they come with enough memory, disk space, and IO ports (like an ethernet port instead of just wifi).
Repurposed desktop PCs provide a good balance of cost and expandability, making them ideal for many homelab scenarios. One thing to consider for future expandability is the size of the case. Smaller cases often will only accept low-profile devices like network or graphics cards. This isn’t normally a problem, but if you were thinking about adding a GPU for gaming your options may be limited. We don’t need anything close to the latest GPUs for our purposes though.
Old laptops are the most cost-effective option with built-in battery backup but offer minimal expansion options. Ensure the hardware that comes equipped is enough for your needs.
Used enterprise servers provide maximum performance and expandability but consume more power and generate more noise. If you have access to one for cheap, it’s a good option, but you may want to invest in some other equipment like a server rack for this.
To compare these options we ranked their initial costs, power consumption, noise level and expandability in this chart so you can compare them.
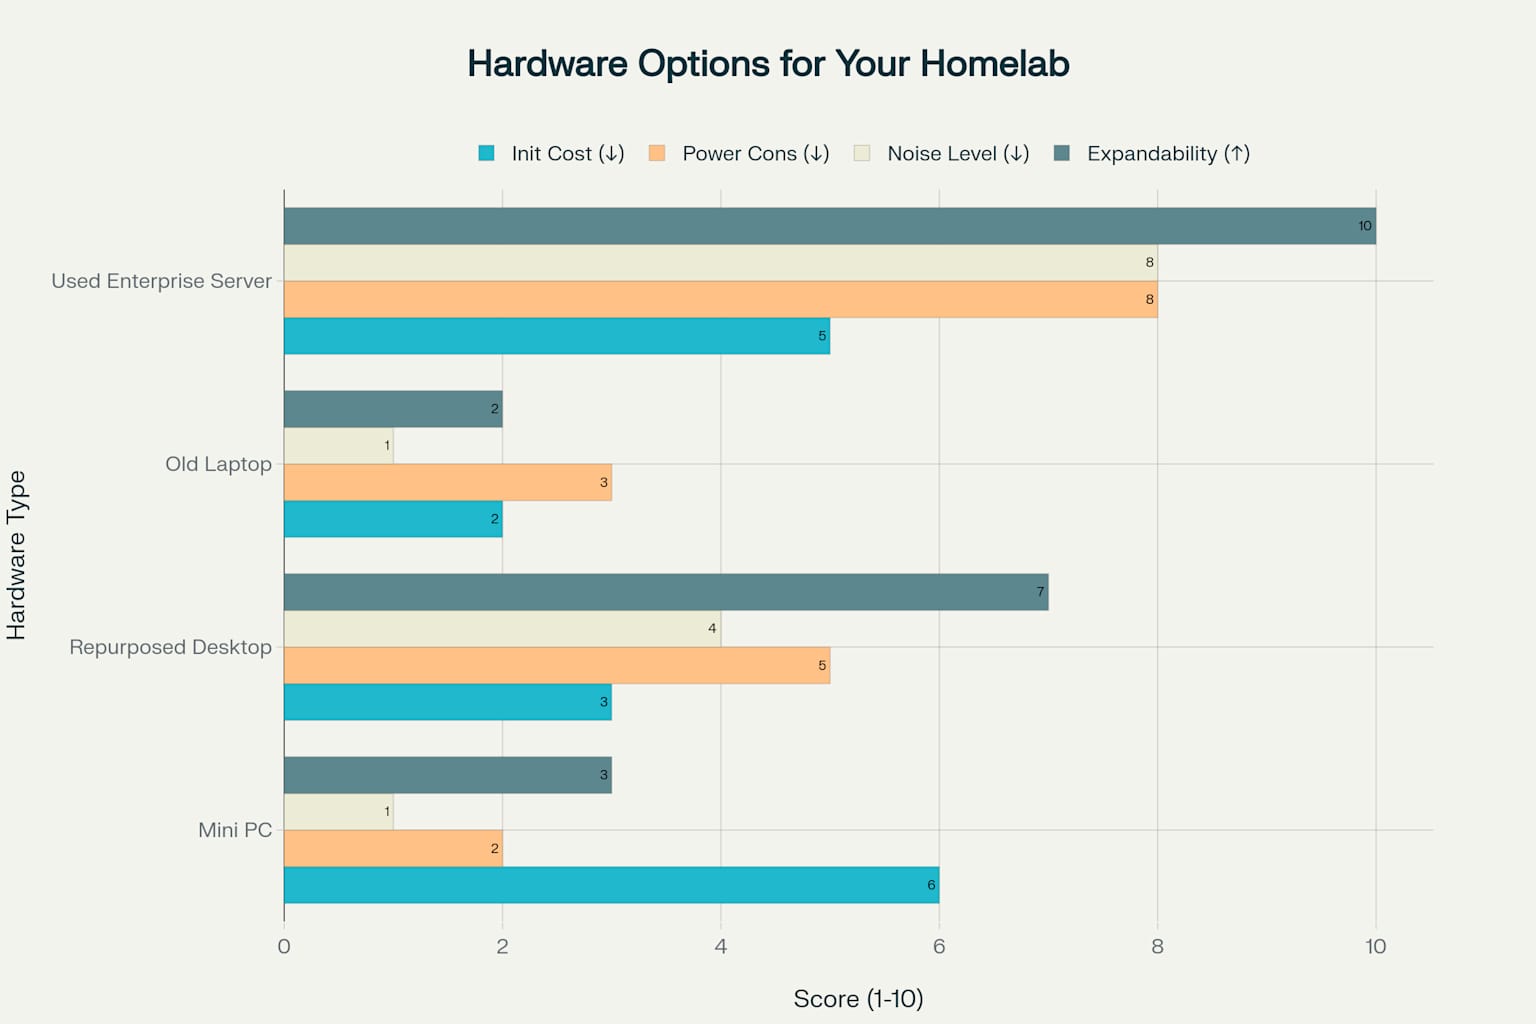
Comparison of hardware options for a homelab server based on cost, power consumption, noise, and expandability
What Hardware Should My Homelab Server Have?
You don’t need the latest and greatest to run a home lab. In fact, older or used gear is often perfect. This makes the barrier to entry into homelabs very low as you can often find what you need either collecting dust in your home, or in second hand markets like ebay or marketplace. When looking at older hardware here’s what you should aim for:
Processor: Any Intel Core i3/i5/i7 from the last 10 years or a comparable AMD chip will work. For smoother media streaming, look for Intel 6th generation (Skylake) or newer, or AMD Ryzen processors with the “G” marker at the end, such as the Ryzen 3 4300G.
RAM: At least 8GB is ideal. More is better if you want to run multiple services, but 8GB is plenty for a basic setup.
Storage: You’ll want at least 250GB of free space. If you plan to store lots of movies or photos, aim for 1TB or more.
Network: A wired Ethernet connection is best for stability and speed, but Wi-Fi can work in a pinch.
Why Hardware Video Decoding Matters
If you want to stream videos smoothly—especially high-definition or 4K content—your server needs to be able to decode video efficiently. That’s where hardware video decoding comes in. It lets your CPU or graphics card do the heavy lifting, so your server doesn’t get bogged down.
Which CPUs have hardware video decoding?
Intel: Look for Intel Core i3/i5/i7/i9 or Core Ultra processors from the Sandy Bridge generation (2011) or newer. These have Intel Quick Sync Video, which handles H.264 and (from Skylake onward) H.265 (HEVC) video decoding in hardware
. Avoid Intel chips with the “F” suffix (like i9-13900KF) if you want to use the built-in graphics for hardware decoding.
AMD: Ryzen APUs (processors with built-in graphics) from the Raven Ridge generation (2018) or newer have Video Core Next (VCN), which supports hardware decoding for H.264, H.265, VP9, and more
. Older AMD chips use UVD (Unified Video Decoder) for H.264 and VC-1.
NVIDIA: If you add a graphics card, most NVIDIA GPUs from the past decade support hardware decoding for H.264, H.265, and AV1.
Where to Find Affordable Hardware
Your Closet: Check for old desktops or laptops you’re not using. Even a five-year-old laptop can make a great home lab server.
eBay, Facebook Marketplace, or Local Thrift Stores: Look for “business desktops,” “mini PCs,” or “workstations.” Search for terms like “Intel i5,” “Intel i7,” or “Ryzen” and check the specs for the model year and features.
Ask Friends or Family: Someone might have an old computer gathering dust that they’d be happy to part with.
How to Check What You’ve Got
If you already have a computer in mind, here’s how to check if it’s suitable:
Check the Processor
Windows: Open the Start menu, type “System Information,” and look for “Processor.”
Mac: Click the Apple menu > About This Mac.
Linux: Open a terminal and type
lscpu.
Check the RAM
Windows: “System Information” will show “Installed Physical Memory.”
Mac: About This Mac > Memory.
Linux: Terminal command
free -h.
Check the Storage
Windows: Open File Explorer, right-click “This PC,” and select “Properties.”
Mac: About This Mac > Storage.
Linux: Terminal command
df -h.
Check for Hardware Video Decoding
Intel: If your processor is Intel Core i3/i5/i7/i9 or Core Ultra from Sandy Bridge (2011) or newer, it likely supports Quick Sync
AMD: If it’s a Ryzen APU from Raven Ridge (2018) or newer, it supports VCN
NVIDIA: If you have a dedicated NVIDIA GPU, check the model online for hardware decoding support.
CPU Video Decoding Quick Comparison Table
Brand | Feature Name | Supported Codecs | Notable CPU/GPU Families |
|---|---|---|---|
Intel | Quick Sync Video | H.264, H.265 (HEVC) | Core 6th Gen (Skylake) + |
AMD | Video Core Next | H.264, H.265, VP9, AV1 | Raven Ridge (2018) + APUs (Ryzen XXXXG) |
AMD | Unified Video Decoder | H.264, VC-1 | Older GPUs |
NVIDIA | NVENC/NVDEC | H.264, H.265, AV1 | GT 1030, GTX/RTX series |
What If Your Hardware Isn’t Perfect?
Don’t stress if your hardware isn’t top-of-the-line. You can still run a home lab with older gear—you might just need to stick to lower-resolution video or fewer services at once. As you get more comfortable, you can always upgrade later.
Wrapping Up
Now you know what to look for and how to check if your hardware is ready for a home lab. In the next post, we’ll walk through preparing your hardware and creating the installation media for Ubuntu Server.
Ready to move on? Let’s get your old tech ready for its new life!
« Back to the homepage | Next: Preparing Your Hardware & Creating Installation Media